

Table of Contents
- Why Hip Flexor Pain Happens and What It Feels Like
- 7 Hip Flexor Pain Relief Exercises at Home
- Hip Flexor Strengthening Exercises for Lasting Relief
- Hip Flexor Strain Recovery Time: What to Expect Week by Week
- Recovery Tools for Hip Mobility You Can Use at Home
- Form Errors, Ergonomics, and Red Flags to Watch For
- Conclusion
- Frequently Asked Questions
Last Updated: September 15, 2026
Why Hip Flexor Pain Happens and What It Feels Like
Hip flexor pain is discomfort in the muscles at the front of the hip that help you lift your knee and bend at the waist, showing up as a deep ache or sharp pull near the leg crease. This Bodyhackfitness guide covers hip flexor pain relief exercises at home that target the source.
The hip flexors include the iliopsoas, rectus femoris, and sartorius, connecting your spine, pelvis, and thigh bone. Sitting for hours keeps them shortened, creating stiffness and a dull ache that lingers after you stand (pubmed.ncbi.nlm.nih.gov).
A common mistake is stretching aggressively the moment you feel a twinge, if the tissue is inflamed, hard stretching makes it worse. Below, we'll show how to tell a strain from simple tightness and which moves to use.
7 Hip Flexor Pain Relief Exercises at Home
These seven exercises run from gentlest to most demanding. Start with the first three in the acute phase, then add the rest as pain allows. Each includes the setup, dose, mechanism, and the most common form error.
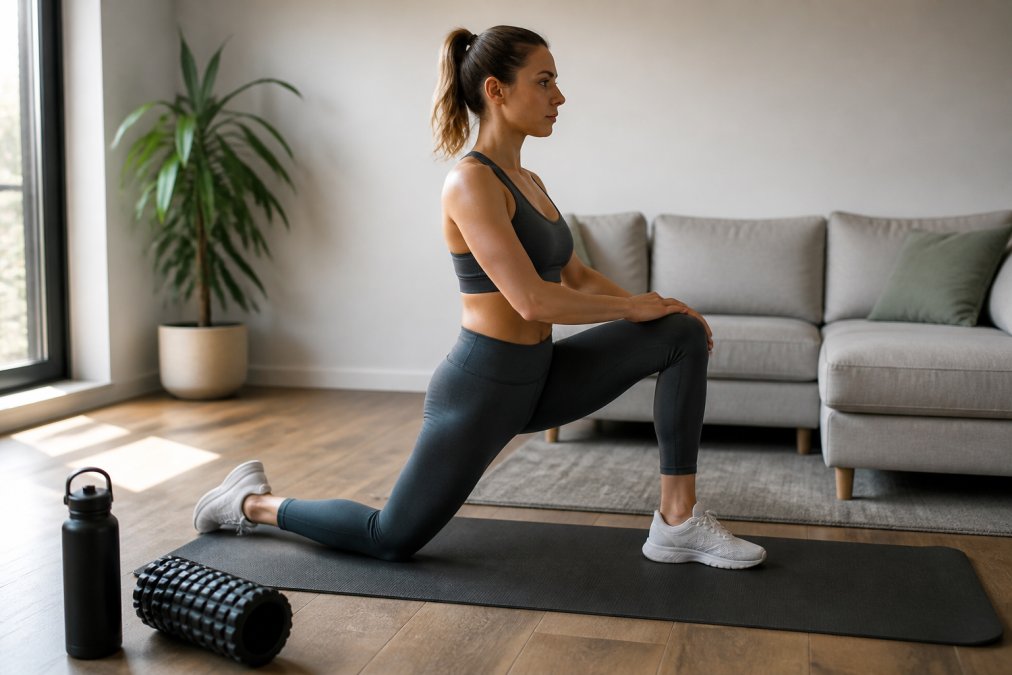
1. Half-Kneeling Hip Flexor Stretch
The half-kneeling stretch directly lengthens a tight iliopsoas. Kneel on one knee with the other foot flat in front. Tuck your pelvis so your lower back flattens, then shift forward until you feel a stretch in the front of the kneeling hip. Hold 30 seconds per side.
The pelvic tilt is the part most people skip, without it you arch your lower back and the hip flexor never lengthens. Keep your ribs down and the kneeling-side glute engaged.
Common form error: Leaning forward from the lumbar spine instead of the hip. If you feel the stretch in your lower back rather than the front of the kneeling hip, you have lost the pelvic tuck. Reset, re-tuck, and try again with a smaller range.
2. Lying Quad Stretch
Lie on your side and pull your top heel toward your glute to open the quadriceps. Hold 30 seconds per side. Keep your knees stacked and your bottom leg slightly bent so your lower back stays neutral.
Common form error: Yanking the heel toward the glute and letting the knee drift backward. That cranks the knee joint rather than the quad. Pull only until you feel a gentle stretch, and stop if the knee itself complains.
3. Supine March (Gentle Activation)
Lie on your back with knees bent and feet flat. Flatten your lower back, lift one knee to about 90 degrees, and lower slowly. Alternate for 8 to 10 slow reps per leg, teaching the deep core to hold a neutral pelvis through a short, pain-free range.
Common form error: Letting the lower back arch off the floor as the knee lifts. If your hand slides under your back, you have lost the brace. Reduce the knee height until you can keep contact.
4. Glute Bridge
Lie on your back, feet flat, and lift your hips until your body forms a straight line from knees to shoulders. Do 10 to 12 slow reps, pausing one second at the top. Weak glutes let the hip flexors overwork, feeding the cycle of tightness and pain.
Common form error: Pushing through the toes and arching the lower back at the top. Drive through your heels, and stop the lift the moment your ribs start to flare.
5. Forearm Plank
A forearm plank builds core stability, protecting the hip joint during movement. Hold 20 to 40 seconds with your pelvis level and ribs pulled down. If it irritates your hip, try a side plank, 15 to 25 seconds per side.
Common form error: Letting the hips sag or pike. Both positions shift load onto the hip flexors instead of the core. If you cannot hold a level pelvis, shorten the hold rather than pushing through.
6. Standing Hip Mobility (Leg Swings)
Hold a wall for balance. Swing one leg forward and back 10 times, then side to side 10 times, keeping your torso upright and pelvis still. Switch sides. This is a mobility drill, not a stretch, keep it smooth and controlled.
Common form error: Rotating the whole torso to gain range. The movement should come from the hip, not the spine.
7. Side-Lying Hip Abduction
Lie on your side with your bottom leg bent for stability. Keep your top leg straight, lift it to about 45 degrees, then lower slowly for 10 to 12 reps per side. This targets the glute medius, which stabilizes the pelvis and reduces the pull on the hip flexors.
Common form error: Rolling the torso backward to lift the leg higher. Stay stacked, and accept a smaller range.
| Exercise | Time or Reps | Frequency | Best Phase |
|---|---|---|---|
| Half-kneeling stretch | 30 sec per side | Daily | Acute |
| Lying quad stretch | 30 sec per side | Daily | Acute |
| Supine march | 8-10 reps per leg | Daily | Acute |
| Glute bridge | 10-12 reps | 3x per week | Rebuilding |
| Forearm plank | 20-40 sec | 3x per week | Rebuilding |
| Standing leg swings | 10 reps per direction | Daily | Maintenance |
| Side-lying hip abduction | 10-12 reps per side | 3x per week | Rebuilding |
How to Tell a Strain From Hip Impingement Before You Start
Before committing to this routine, run a quick self-check. A hip flexor strain produces a deep ache or pulling sensation in the front of the hip that worsens with a hard contraction, like lifting your knee against resistance, and eases with rest. Hip impingement, where the ball of the hip joint pinches against the socket, produces a sharp, pinching catch at the front of the hip when you bring the knee toward your chest, often with a clicking sensation (Hip Strains - OrthoInfo). Impingement does not respond to stretching the way a strain does, and deep hip flexion can make it worse. If your pain is a pinch rather than an ache, skip the deep stretches and see a physical therapist.
Hip Flexor Strengthening Exercises for Lasting Relief
Stretching alone rarely fixes recurring hip flexor pain, the muscles need to tolerate load, which is what hip flexor strengthening exercises build. Progressive loading means starting with bodyweight moves and adding resistance only when the current level feels easy, but most home routines skip the how: what to add, when, and how to know you are ready.
The Three-Stage Progression
Think of strengthening as three stages, each with a clear exit criterion. Advance on control, not the calendar.
Stage 1, Isometric holds (Week 1-2). An isometric is a contraction with no joint movement, the safest way to load a healing muscle. Sit on a chair and press your knee into your own hand for 5 seconds, then relax. Do 5 reps per side, twice a day. Advance when you can hold a 5-second press with no pain or next-day soreness.
Stage 2, Controlled concentric work (Week 2-4). Add slow marches, lifting one knee to hip height with your torso upright.
Why the Order Matters
Progression Rules That Keep You Safe
Hip Flexor Strain Recovery Time: What to Expect Week by Week
Recovery Tools for Hip Mobility You Can Use at Home
Form Errors, Ergonomics, and Red Flags to Watch For
Conclusion
Frequently Asked Questions
How do I know if my hip flexor pain is serious?
See a doctor or physical therapist if pain follows a fall or sudden pop, you cannot bear weight, swelling or bruising appears, or pain lasts more than two weeks despite rest. Sharp anterior hip pain that worsens with every step is also a red flag. Mild tightness or soreness after sitting or training usually responds to hip flexor pain relief exercises at home within days.
What is the fastest way to relieve hip flexor pain?
Start with gentle movement rather than aggressive stretching. A half-kneeling hip flexor stretch held for 30 seconds, followed by glute bridges and light walking, often eases acute symptoms. Applying a foam roller or massage gun to the quadriceps and iliopsoas area can reduce tightness. If pain spikes, stop and rest. Persistent pain needs evaluation by a physical therapist.
How long does it take for a hip flexor strain to heal?
Most mild hip flexor strains improve in one to three weeks with rest and rehab exercises. Moderate strains can take four to six weeks, and severe strains may need two to three months of progressive loading. Recovery time depends on age, activity level, and how soon you start hip flexor strengthening exercises. Returning to sport too early is the most common cause of re-injury.
Should I stretch a strained hip flexor?
Stretch only after the acute phase, usually 48 to 72 hours after injury. Early aggressive stretching can worsen inflammation and delay tissue recovery. Begin with isometric holds and gentle range of motion, then add kneeling stretches once pain-free. Pair stretching with glute activation and core stability work so the hip joint moves without overloading the iliopsoas.