


Table of Contents
- Why Your Lower Back Hurts During Overhead Presses
- What Happens to Your Spine Under a Loaded Bar
- A Step-by-Step Self-Assessment for Overhead Press Form
- Thoracic Mobility for Overhead Press: The Missing Link
- Core Bracing, Rib Flare, and Trunk Position
- Overhead Press Alternatives for Back Pain
- Low Back Pain Red Flags: When to See a Professional
- Conclusion
- Frequently Asked Questions
Last Updated: October 8, 2026
Why Your Lower Back Hurts During Overhead Presses
If your lower back hurts during overhead presses, the bar is usually not the problem, your spine is. When the lower back overarches to finish a press, it takes on a load the shoulders and upper back should carry.
Below, we'll show you how to find the cause, fix your form, and press without pain.
Overhead press back pain is lower-back discomfort during or after pressing overhead.
What Happens to Your Spine Under a Loaded Bar
Your lumbar spine is built to carry load in a neutral position, not an arched one.
If your ribs flare up and your lower back arches, the joints at the back of the spine get squeezed. Muscles strain.
Three things usually go wrong at once:
- The upper back cannot extend enough to clear the bar
- The core stops bracing, so the trunk goes loose
- The glutes switch off, letting the hips tip forward
Fix any one of these and the pressure on your lower back drops. Fix all three and the press feels completely different.
A Step-by-Step Self-Assessment for Overhead Press Form
Step 1: Setup check (30 seconds)
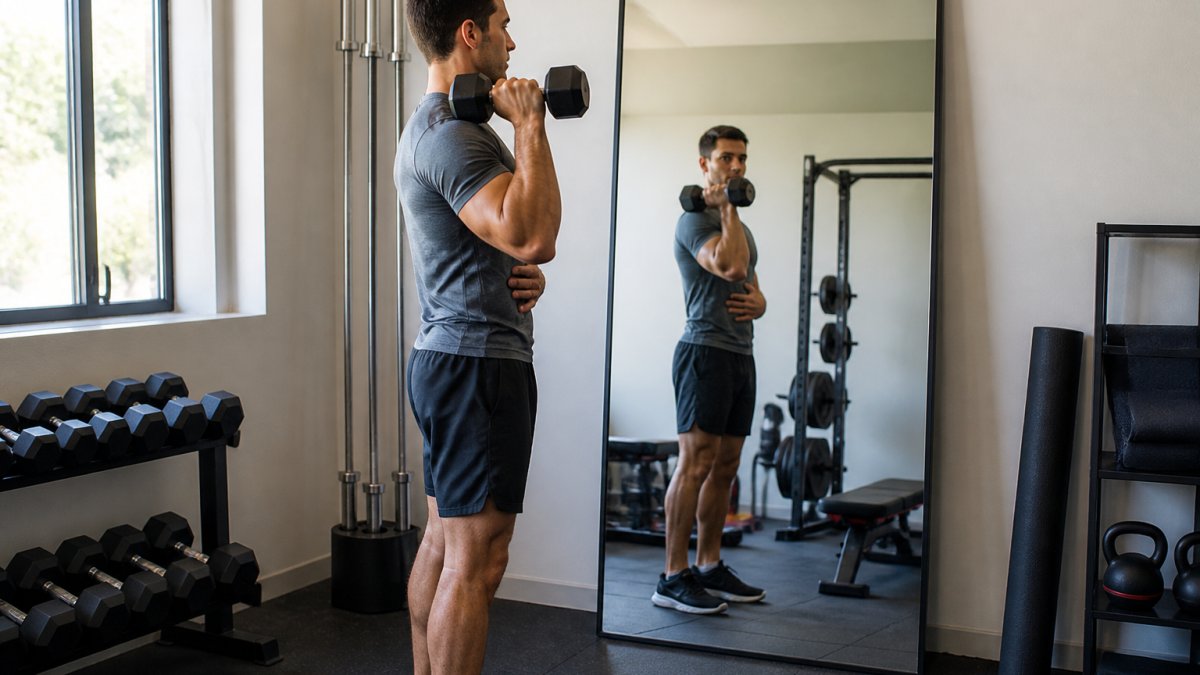
Stand sideways to a mirror, feet hip-width apart, light dumbbell at one shoulder.
- Squeeze your glutes and brace your abs as if bracing for a light punch.
- Look for your ribs sitting roughly over your pelvis, not lifted toward the ceiling.
- If your lower back is already arched before the weight moves, your setup is the problem. Reset before you press.
Step 2: Mobility check (2 minutes)
Stand with heels, glutes, upper back, and head against a wall.
- If your lower back peels off, your overhead range of motion is limited.
- If your arm cannot reach overhead without your ribs lifting, your thoracic spine or shoulder is the likely limiter.
- If you can press overhead with your back flat against the wall, mobility is probably not your main issue.
Step 3: Trunk check (2 minutes)
- If your ribs stay lifted after a full exhale, your trunk position is the problem.
- If you can drop your ribs and keep them down while bracing, your trunk control is likely adequate.
Step 4: Load check (3 minutes)
Press a broomstick or empty bar overhead in front of a mirror.
- If your form holds with the broomstick but breaks with a loaded bar, your issue is load-related, not purely mobility.
- If your form breaks even with the broomstick, your issue is technique or mobility.
Step 5: Glute check (1 minute)
Squeeze your glutes hard before the press.
How to read your results
- Fail Step 1 or Step 5 first: setup and bracing issue. Fix your brace and glute squeeze before adding load.
- Fail Step 2 first: mobility issue. Spend two weeks on thoracic and shoulder drills before heavy pressing.
- Fail Step 3 first: trunk position issue. Practice rib-down breathing and bracing daily.
- Fail Step 4 first: load issue. Reduce weight by 20 to 30 percent and rebuild with strict form.
If you fail more than one step, start with the earliest failure.
This is a self-assessment, not a diagnosis.
Thoracic Mobility for Overhead Press: The Missing Link
Thoracic mobility for overhead press is your upper back's ability to extend and rotate so your arms reach overhead without your lower back helping. It is the link most lifters skip, and usually the real culprit.
A stiff upper back forces the lumbar spine to arch. If the thoracic spine will not move, the lower back will.
Mobility Drills to Try Before Your Next Session
Spend five to ten minutes on these before pressing:
- Foam roller extensions: Lie with the roller under your mid-back and gently extend over it. Move slowly, one segment at a time.
- Thoracic rotations: On all fours, thread one arm under your body and reach, then open to the ceiling.
- Wall slides: Stand with your back to a wall and slide your arms up and down while keeping contact.
- Band pull-aparts: Hold a band at chest height and pull it apart, squeezing your shoulder blades together.
A high-density foam roller works well for the extension drill. Our American Council on Exercise guide to foam rolling covers how self-myofascial release supports flexibility and recovery.

We stock a 33 cm high-density foam roller that fits neatly under the mid-back for this drill and is light enough to keep beside your rack.
Do these drills daily for two weeks. Most lifters feel the difference in their press setup within that window.
Core Bracing, Rib Flare, and Trunk Position
Core bracing means creating tension around your spine before the weight moves. Without it, your trunk goes soft and your ribs flare upward, tipping your lower back into an arch.
Foam roller Roller For body Relief →
Here is how to brace correctly:
- Take a breath into your belly, not your chest
- Wrap your abs as if bracing for a light punch
- Keep your ribs stacked over your pelvis
- Squeeze your glutes to lock the hips in place
Rib flare is the tell. If your ribs lift toward the ceiling during the press, your trunk position has failed. Stop the rep, reset, and press again.
Abdominal engagement and glute activation work together here. One without the other leaves a gap the lower back fills.
Overhead Press Alternatives for Back Pain
You do not have to give up pressing, you have to change how you press while form and mobility catch up. Overhead press alternatives for back pain let you train shoulders without loading an arched spine. Pick a variation that matches your current limit, then progress deliberately.
Try these swaps, ordered from most to least demanding on your lower back:
- Seated dumbbell press with back support: The bench gives your trunk a reference point and limits arching. Start with a light pair and keep your ribs down.
- Half-kneeling single-arm press: Kneeling removes the leg drive that hides a weak core. Press one arm at a time and watch for your ribs lifting.
- Landmine press: The angled bar path keeps the load in front of you, which is far kinder to the lower back. This is often the best starting point if pressing overhead hurts.
- Incline press: A slight bench angle reduces the overhead demand on your shoulders. Use a low incline, around 30 degrees, to keep some overhead carryover.
Standing vs. Seated, Dumbbell vs. Barbell
| Variation | Lower-Back Demand | Best For |
|---|---|---|
| Standing barbell | Highest | Lifters with solid bracing and mobility |
| Seated barbell | Moderate | Building strict pressing strength |
| Seated dumbbell | Lower | Rehab and early return to pressing |
| Half-kneeling dumbbell | Lower | Training core stability under load |
| Landmine press | Lowest | Pressing with back pain |
| Floor press | Lowest | Early return when overhead range is limited |
Standing barbell presses demand the most from your trunk. If your lower back hurts, start seated, half-kneeling, or with a landmine and earn your way back to standing.
A pair of rubber-coated cast iron dumbbells makes the seated and half-kneeling versions easy to load at home. The knurled chrome handle gives a secure grip, and the rubber heads protect your floor.

How to Regress, Modify, and Return to Pressing
Use this progression as a guide, moving to the next stage only when you complete the current one without lower-back pain during or after the session.
Stage 1: Pain-free range and light load (1 to 2 weeks)
- Start with a landmine press or floor press using a load you could press for 12 to 15 reps.
- Keep reps in the 10 to 12 range and stop two reps short of failure.
- Focus on keeping your ribs down and your glutes engaged.
Stage 2: Seated or half-kneeling pressing (1 to 2 weeks)
- Move to a seated dumbbell press with back support or a half-kneeling single-arm press.
- Use a load you could press for 10 to 12 reps, and keep reps in the 8 to 10 range.
- Add one set per week if your lower back stays quiet.
Stage 3: Standing press with light load (1 to 2 weeks)
- Return to a standing dumbbell or barbell press with about 50 to 60 percent of your previous working weight.
- Keep reps in the 6 to 8 range and film from the side to check your rib position.
- If your lower back arches, drop back to Stage 2 for a week.
Stage 4: Return to normal pressing (ongoing)
- Add weight in small increments, about 5 percent per week.
- Keep one landmine or seated session per week as a form check.
- If pain returns, drop back one stage rather than pushing through.
If unsure where to start, begin with the landmine press, the most forgiving on the lower back while still training the shoulders through a pressing pattern.
Low Back Pain Red Flags: When to See a Professional
Some lower-back pain during lifting is a form problem. Some is not. Low back pain red flags mean you should stop pressing and see a doctor or physical therapist.
Watch for these signs:
- Pain that shoots down your leg, or numbness and tingling
- Weakness in your leg or foot
- Pain that wakes you at night or does not ease with rest
- Loss of bladder or bowel control (Cauda equina syndrome: a review of the current clinical and medico-legal position)
- Pain after a fall or a sudden pop during a lift
The last two on that list need urgent care. The others need a professional assessment before you train again.
Self-diagnosis has real limits. You can spot a form fault, but you cannot rule out a disc or joint issue from your living room. MedlinePlus overview of low back pain explains when symptoms point to something beyond muscle strain.
If your pain is mild and only shows up during pressing, a form fix and a short deload often solve it.
Conclusion
Lower-back pain during overhead presses is a signal, not a sentence. Your spine is telling you the load moved somewhere it should not have, and the fix is almost always mobility, bracing, or a smarter variation.
At Bodyhackfitnesss, we built our recovery and training gear around that idea. Start with our high-density foam roller for thoracic work, add a compact EVA roller for post-session recovery, and load your regressions with our rubber-coated dumbbells.

Shop now and build a pressing setup that protects your back while you get stronger.
Frequently Asked Questions
Why does my lower back hurt when I do overhead presses?
Most often it comes down to compensation: when your thoracic spine or shoulders lack overhead range of motion, your lumbar spine arches to finish the lift. That excessive back arch loads tissue that isn't built to press. Add a heavy load and repeated reps, and you get lower-back pain during or after pressing. A form check and a mobility screen usually reveal the cause.
Should I stop overhead pressing if my lower back hurts?
Stop the session if pain is sharp, travels down a leg, or gets worse with each rep. For mild soreness, switch to a regression like a half-kneeling single-arm press for one to two weeks, then rebuild. If pain persists past a week or two, see a physical therapist or physician before returning to heavy overhead lifting.
Can tight shoulders or limited thoracic mobility cause lower back pain during overhead presses?
Yes. If your thoracic spine and shoulders can't reach full overhead range of motion, your body finds the range somewhere else, usually the lumbar spine. That compensation shows up as excessive back arch, rib flare, and low-back discomfort. Thoracic mobility drills before pressing often reduce the arch and the pain.
Can I do a seated overhead press instead of a standing press?
A seated press with back support limits how much your lumbar spine can arch, which can reduce lower-back pain. Keep both feet flat, brace your core, and avoid pressing the lower back into the pad. If seated pressing still hurts, try a single-arm half-kneeling press or a landmine press as a bridge back to standing work.