


Last Updated: November 11, 2026
Quick Summary
Use yoga blocks to improve hip flexibility by placing one under your back knee in a kneeling lunge, under your pelvis for a reclined psoas stretch, or under your hands for support. Pick the lowest height that lets you breathe without your lower back arching, then progress by lowering the block.
- Most foam and cork blocks are about 9 by 6 by 4 inches, giving three usable heights.
- Hold the kneeling hip flexor stretch for 20 to 30 seconds per side.
- Run the full block routine for about 12 minutes, three to four times a week.
- Tuck your pelvis first so you stretch the hip flexor, not the lower back.
- Give the tighter hip an extra 10 to 15 seconds per hold.
Table of Contents
- Why Yoga Blocks Make Hip Stretching More Effective
- How to Set Up Your Blocks: Height, Orientation, and Placement
- The Yoga Block Hip Flexor Stretch: A Step-by-Step Progression
- Yoga Block Hip Mobility Exercises for Range of Motion
- The Yoga Block Psoas Stretch for Deep Hip Release
- Yoga Block Stretches for Tight Hips: A Complete Routine
- Safety, Common Mistakes, and When to Back Off
- Build Your Home Hip Mobility Setup
- Frequently Asked Questions
Why Yoga Blocks Make Hip Stretching More Effective
Yoga blocks turn a vague stretch into a measurable one. The block removes the guesswork about where your body should be, so you can focus on relaxing into the stretch instead of bracing against gravity.
Hip flexibility is the usable range of motion at the hip joint, while hip mobility is that range under control. The difference matters. You can be loose and still unstable.
Here is what most guides get wrong. They treat blocks as beginner gear you graduate from. In practice, blocks are a precision tool. They let you:
- Set a fixed height so you can track progress week to week
- Support the pelvis so the hip flexor can lengthen instead of the lower back arching
- Reduce balance demands so you can hold a stretch longer
- Raise the floor for tight hips without forcing depth
The research base here is thin. A study in the International Journal of Sports Physical Therapy looked at a daily lunge-and-reach program and hip-flexor length, but it did not test blocks specifically. So treat blocks as a setup aid, not a magic fix.
How to Set Up Your Blocks: Height, Orientation, and Placement
Block setup comes down to three choices: height, orientation, and where the block sits under your body. Get these right and the stretch targets the hip instead of the lower back.
Height. Most foam and cork yoga blocks are roughly 9 by 6 by 4 inches, which gives you three usable heights: 4 inches flat, 6 inches on the long edge, and 9 inches standing tall. Pick the lowest height that lets you breathe without your lower back arching. If you feel your ribs flare or your knee complain, drop one height.
Orientation. Flat is the most stable and is the default under a knee or pelvis.
Placement. Under the back knee in a kneeling lunge, the block raises the knee so the hip flexor can lengthen without the pelvis tipping forward.
| Pose | Height | Orientation | Placement |
|---|---|---|---|
| Kneeling hip flexor stretch | 4 in flat, progress to 6 in on edge | Flat, then on edge | Under the back knee |
| Reclined psoas stretch | 4 in flat or 6 in on edge | Flat or on edge | Under the pelvis |
| Half-kneeling lunge | 6 in or 9 in | On edge or tall | Under each hand |
| Seated hip opener | 4 in flat | Flat | Under the bent knee |
| Standing balance assist | 9 in tall | Tall | Under one hand at a wall |
A common mistake is stacking blocks under the hands and then collapsing into the shoulders. If your chest drops, the block is too low.
Check stability before you load the block. Press down with your hand or knee; if the block rocks or slides, change orientation or move to a mat with more grip.
You can see the actual blocks we carry to match these setups.
The Yoga Block Hip Flexor Stretch: A Step-by-Step Progression
The yoga block hip flexor stretch is a kneeling lunge with the back knee supported, which lets the hip flexor lengthen without the pelvis tipping forward. Start here and add depth only when the current step feels easy.
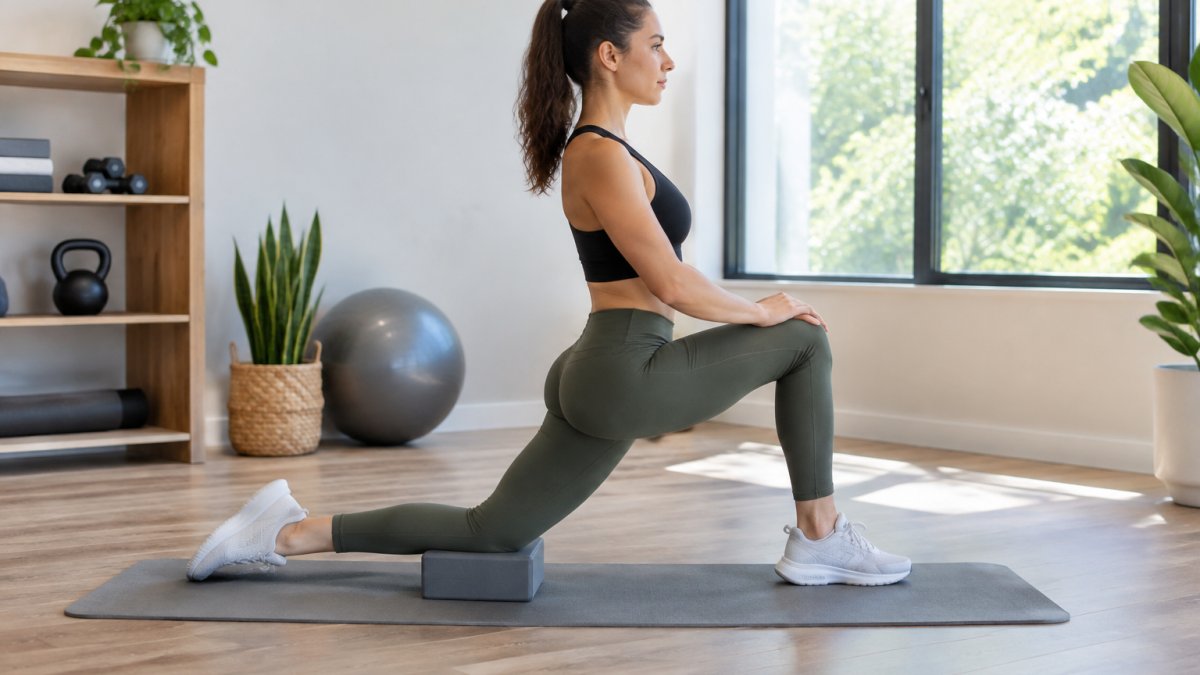
- Kneel with the block under your back knee. Set the block flat. Rest the knee on it.
- Step the other foot forward. Front knee over the ankle, not past the toes.
- Tuck your pelvis slightly. This is the move most people skip. It starts the stretch.
- Lean forward an inch. Stop at the first real stretch, not the first pinch.
- Hold and breathe for 20 to 30 seconds. Then switch sides.
- Progress by lowering the block. Flat, then on edge, then remove it.
Watch out: pushing the hips forward while the ribs flare means you are stretching your lower back, not your hip flexor. Keep the ribs down.
Yoga Block Hip Mobility Exercises for Range of Motion
Hip mobility exercises differ from static stretches because you move through the range, not just sit in it. These yoga block hip mobility exercises build control at the end of your range.
Try these three:
- Blocked leg lift: Lie on your back, one knee bent, the other leg straight. Lift the straight leg, then lower it slowly. Place a block under the foot if you cannot reach.
- Standing hip flexion with block support: Stand sideways to a wall, hand on a block against the wall for balance. Lift one knee to hip height, then lower with control.
- Seated block press: Sit tall, block between your thighs. Squeeze gently, then release. This wakes up the inner hip and glutes.
Slow movement beats big movement here. A controlled range of motion you can repeat is worth more than a deep stretch you cannot hold.
The Yoga Block Psoas Stretch for Deep Hip Release
The yoga block psoas stretch targets the deepest hip flexor, the psoas, by supporting the pelvis so the muscle can release instead of guarding. The psoas runs from the lower spine through the pelvis to the thigh bone.
Set it up like this:
- Lie on your back near the edge of a mat or low surface.
- Place a block under your pelvis at the height that feels supported, not painful.
- Let one leg hang off the edge, knee bent.
- Breathe slowly and let the front of the hip soften.
A 2026 study on prenatal yoga and hip mobility is listed in PubMed Central, but its findings are not established in the available summary, so we will not claim a result from it.
If you feel a sharp pinch in the front of the hip, back off. Deep release should feel like a slow melt, not a stab.
Yoga Block Stretches for Tight Hips: A Complete Routine
Yoga block stretches for tight hips work best as a short, repeatable routine rather than a long session you do once. Here is a sequence that takes about 12 minutes.
- Warm up: 1 minute of gentle leg swings and hip circles
- Hip flexor stretch: 30 seconds per side, block under back knee
- Psoas release: 60 seconds per side, block under pelvis
- Seated hip opener: 45 seconds per side, block under the bent knee
- Blocked leg lowering: 8 slow reps per side
- One-leg balance hold: 20 seconds per side, hand on a block for support
Do this three to four times a week. Gradual progression matters more than intensity. Add a rep or lower the block only when the current version feels genuinely easy.
If you want to pair this with resistance work, our guide on yoga and dumbbells shows how to merge both. And to make it stick, build it into a home exercise schedule you can actually keep.
Safety, Common Mistakes, and When to Back Off
Safety comes down to knowing the difference between stretch and damage. A productive stretch feels like tension or a dull pull that eases as you breathe. Stop and reassess if you feel sharp pain, numbness, tingling down the leg, or a pinch in the front of the hip that does not fade within a few breaths.
Run this self-check before each hold:
- Ribs down: place one hand on your lower ribs. If they lift toward the ceiling, you are arching the lower back instead of stretching the hip flexor. Tuck the pelvis first.
- Even pelvis: in a kneeling lunge, check that both hip bones point forward. Twisting toward the front leg shifts the stretch to the lower back.
- Breath: if you cannot take a slow inhale through the nose, the depth is too much. Back off one block height.
- Symmetry: compare sides. Most people are tighter on one hip; give that side more time rather than forcing the tighter side to match.
The mistakes we see most:
- Arching the lower back to fake depth. Tuck the pelvis first.
- Holding your breath. Long exhales help the muscle release.
- Skipping the warm-up. Cold hips resist; one minute of leg swings and hip circles changes the feel of the first stretch.
- Chasing depth too fast. Range comes from consistency, not force. Lower the block only when the current height feels genuinely easy for a full week.
- Ignoring one side. Give the tighter hip an extra 10 to 15 seconds per hold.
Adapt the setup rather than skipping the work. If kneeling is uncomfortable, do the hip flexor stretch standing with the back foot on a low step and hands on a tall block. If lying on your back is uncomfortable, do the psoas stretch side-lying with a block under the top knee. During pregnancy, avoid deep backbends and long holds on the back after the first trimester, and clear the routine with your clinician.
Sore, tight muscles after training often respond well to release work. A foam roller pairs nicely with this routine.
Build Your Home Hip Mobility Setup
A home hip mobility setup needs very little: two blocks, a mat, and a wall. That is it.
Two blocks let you run the two-block routine without stopping to reposition. One under the knee, one under the hand or pelvis. Our guide on how thick a yoga mat should be helps you match the mat to your floor and joints.
Keep the setup visible. Gear that lives in a closet does not get used. Leave the blocks by the mat so the routine is the path of least resistance.
Hip tightness rarely fixes itself, and forcing depth usually makes it worse. The better path is a small, repeatable routine with the right support under you. At Bodyhackfitness, we stock blocks and recovery gear built for exactly that kind of consistent, at-home practice, alongside digital programs that give your sessions structure.
Frequently Asked Questions
Can I use a yoga block to stretch my hip flexors?
Yes. A yoga block gives your back knee support in a kneeling lunge, which lets you sink deeper without collapsing the pelvis. Place the block under the knee at its tallest setting first, then lower it as your hip flexor stretch improves. Keep the pelvis tucked slightly and hold 30 to 45 seconds per side. The block removes the pressure on the kneecap so you can focus on the front of the hip rather than bracing against discomfort.
How should I position a yoga block during a hip stretch?
Position depends on the stretch. For a kneeling hip flexor stretch, put the block under the back knee. For a psoas stretch, place it under the back knee and keep the front foot flat. For seated stretches, sit on the block to tilt the pelvis forward. Start at the tallest height that feels stable, then lower it as your range of motion grows. Always check that the block sits flat and does not rock before you load it.
How long should I hold a yoga block-assisted hip stretch?
Hold most hip stretches for 30 to 45 seconds and repeat two to three times per side. For the psoas stretch, a slower 60-second hold with steady breathing works well because the muscle responds to gradual lengthening. Avoid bouncing. Move into the stretch slowly, hold a controlled range, and come out just as slowly. If you feel sharp pain rather than a stretch, reduce the block height or back off the depth.
Are yoga blocks helpful for beginners with tight hips?
They are one of the most useful tools a beginner can own. Blocks raise the floor to meet you, so you do not have to force depth your hips are not ready for. A beginner can start with a tall block under the knee or sit on a block for seated poses, then lower the height over weeks as flexibility improves. This gradual progression keeps the stretch comfortable and makes it easier to stay consistent.
